CLICK HERE FOR FREE BLOGGER TEMPLATES, LINK BUTTONS AND MORE! »

Saturday, October 10, 2009

Christmas Cards.

A couple of times now I've made cards for a friend. She owns an amazing business and once in a while will attend trade shows and request cards for her clippos. The last time I did Birthday cards for her and this time I did up 20 Christmas cards.

Since I have so much on the go (and did not want to turn down a great friend!) I chose a very simple layout/design. After digging through my craft "corner" and finding my tools, paper and stamps, I was able make up this card.

The stamp is from the set "Deer Friends" which was a hostess lvl 2 stamp set last yr. I loved it then and I still love the stamps in the set now. I will probably end up using a stamp from the set for my own Christmas cards. :0)

Ingredients:
Stamps: Deer Friends (hostess lvl 2)
Papers: Kiwi Kiss, Real Red, Ski Slope DSP, Whisper White
Tools: Scallop Punch, Circle Punches, 1/8" punch and random red ribbon from Michaels

Monday, October 5, 2009

Little Red Riding Hood Costume Complete!

I don't think I can even express how happy I am that this costume if finally completed! It went from a project that I thought was going to be fairly easy, to something that got fairly complicated fast.

I've posted about the dress and over-skirt and how the pattern was not as comprehensive (at least I felt so) to doing the cloak, which really did not have much of a pattern to it at all.

The cape part of it was pretty easy, measure the length of my kid from her shoulders to where I wanted the cloak to end, cut on the fold, repeat for the lining, then sew both together. The hood though, well that was a whole other matter.

The pattern I followed for the cloak was for an adult, so the hood measurements were wayyyy too big. I then found one on Marthastewart.com, however, it was too small and when I increased the measurements, it looked a bit too KKK with such a pointy hat.

So after a few adjustments, guessing the measurements and doing a trial 'hood' bc my daughter was not being very cooperative about trying it on, I followed the directions on MS's site, but then curved the top of the hood so it was not pointy but rounded. :0)

Looking back on this project, it really was not that hard. The satin is a pain to sew bc it moves and I do not have a walking foot for my machine, and figuring out measurements was a bit mind boggling, but I'm pretty proud of how it turned out.

Details:
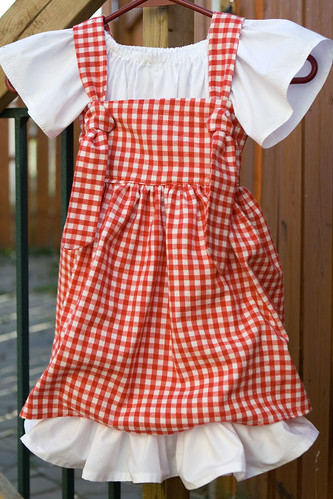
Peasant Dress or Top - I purchased the pattern from a seller on Etsy and bought 2m of white cotton fabric for I think 7.99 at my local fabric store. I had a bit left over but not a lot. I used a crazy amount of it on the ruffle along the bottom of the dress. I've debated adding lace to the sleeves, but I think it's fine as is. :0)

Over-skirt - I bought this pattern from the same seller as the peasant dress from. I bought 1.5m of Red Gingham Cotton Fabric at the same Local Fabric store. I had some left over, but not a lot. I think it was 12.99/m?

Cloak - I used both this pattern and this 
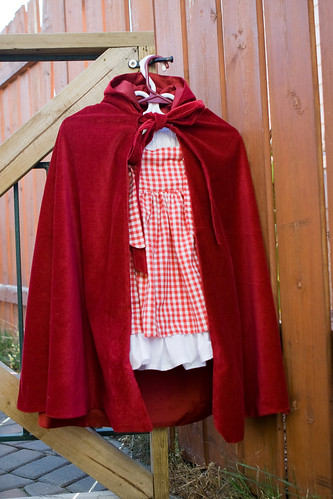
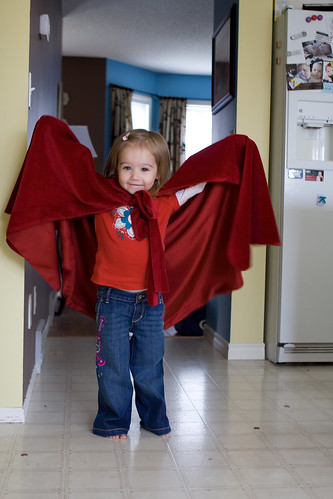
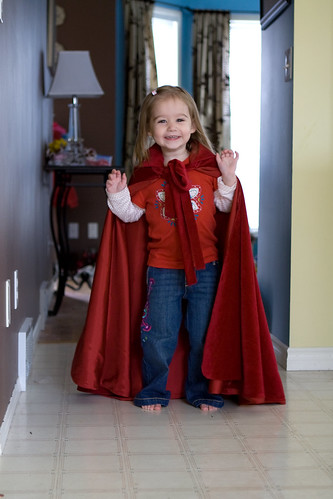
pattern and then in the end basically designed my own hood to suit my needs and fit Tasha's head. hah For the cloak I used a 36" length and 1/4" in seam. I bought a deep cranberry red velvet (2 metres) for the outer part of the cloak and then lined it with a deep red Satin(3 metres). I had to get more of the satin then I really wanted because it was only a width of 27" and I needed 36" so I was not able to fold it and cut it out. :0( Sewing the two fabrics together was a huge PITA because the satin is so slippery. I can't remember the price on the Velvet, I think $20/m? or the Satin. I spent way more then I wanted, but I knew I wanted a nice lush cloak. She loves wearing it so I figure it will be used for dress up after halloween. Of course today she was flying around the house with it on saying she was a super hero. haha

I had a bit of trouble with the ties on the cloak, but this morning was able to figure it out. I sewed the hood on to the velvet first, then turned it inside out, and sewed it again, leaving an opening to turn it right side out again. That's when I realized the excess fabric on the hood would work for casing in the tie. :0) I knew I had to do some sort of casing, but could not wrap my head around how to do it hem the hood in. hah Thankfully baby brain eased up and I figured it out.

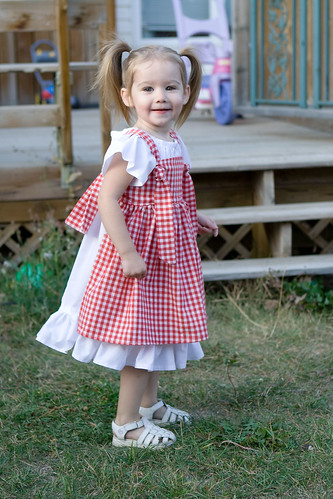
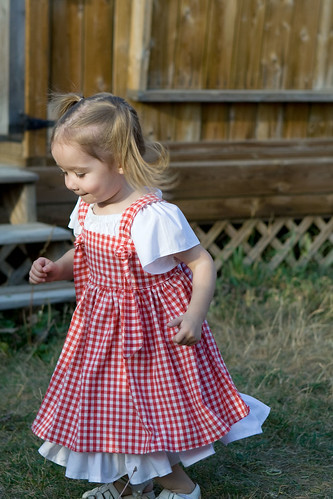
Anywho, it's done and I could not be happier with the end result. :0) Some pics of the doodlebug in it. I did not have the energy to get her in the complete outfit (dress/over-skirt/cloak), but will be sure to get some pics on Halloween. :0)
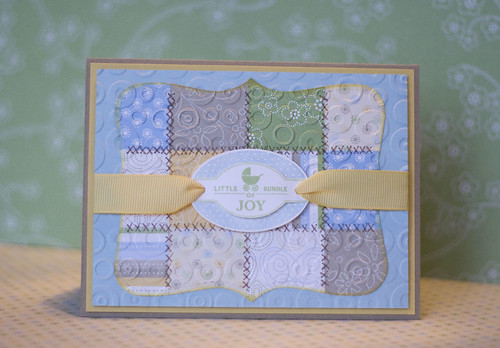


Wednesday, September 16, 2009

Little Red Riding Hood take 2

Last week I cut the fabric for the over-skirt for N's LRRH costume and then ignored it until Monday, when I finally forced myself to start working on it. Yes, forced. For some reason I was not really looking forward to making this part of her costume. I bought the pattern for it on Etsy, the same seller I bought the dress pattern from and as you may remember in a previous post, the instructions were not the most clear. The over-skirt was a bit better, but I was still worried.

Anyway, I finally started work on it Monday morning and finished it by mid afternoon. It was not as hard as I thought it would be, but I had an unwilling toddler when it came to trying it on for fits to check length and positioning of the straps.

In the end, I'm super happy with how it turned out and think that she could even wear the overall outfit w/o anyone thinking it was a costume. :0)

I'm still debating adding some lace to the sleeves and I may still, but I still have the Hood left to make as well as the pettiskirt. So if I can get those things done in time, I will go back and add some lace to the sleeves of the dress if I still have time.

The back:


The little darling in it. She was a bit upset to put it on for about 2 secs and then was fine with it. Much better then earlier "sizing" checks.

Saturday, September 5, 2009

Halloween Costume - Part 1

To say how proud I am of myself would be an understatement when it comes to this dress. After seeing this listing on Etsy for a Little Red Riding Costume, I thought to myself, "How hard can that be really?" There was no way I was spending $170 on a costume for my child that would be worn once, so I went on the hunt for patterns for the cloak and dress. The apron seemed easy enough.

So I did some searching on Etsy and found a pattern for a peasant dress and over-skirt and thought perfect! It was not until I got the patterns that it was not so perfect or easy. As I mentioned, the design was great, the instructions though were not too clear and a bit more complicated then need be.

After some ripping, a little re-write of the directions and changing the measurements to fit my child, the end result is this simple white dress.

What I changed from the pattern was - length, width, added the ruffle along the bottom and I'm thinking about using elastic thread on the sleeves and adding some eyelet lace.

Next I'm going to start the over-skirt. Maybe tomorrow, I have to work a few hours in the morning so I'll see how I'm feeling.

I tried to take some pictures of N in it, but she was in a super goofy mood so they were mostly blurred. I did capture this one though. It looks like she has quite the stagger. hah


Wednesday, August 26, 2009

WIWOW


This week I've started to work on N's Halloween costume. On Tuesday when I showed up for my doctor appointment a day late, I decided since I was halfway there, I'd drive to the Fabric store and find the fabric for her costume. Last week I picked up the Velvet, a lovely deep cranberry red colour, so I just needed the White Cotton and some Red Gingham.

After I washed and dried the white cotton and red gingham I noticed the red gingham looked a lot like a table clothe. hah. However, while my faith might not be too high in my ability to sew a simple dress, over-skirt and cloak, I'm pretty sure that no matter how it turns out, once the red gingham is sewn into the over-skirt, it won't look like a table clothe.

Due to my fear of things not working out, I've only gotten as far as cutting the main dress part from the white cotton. I still need to cut armholes, the sleeves and the ruffle for along the bottom of the dress. The mock up of the dress I did was too short, so this time when I cut out the main body of it I added a few inches. I'll try it on her and then cut off the extra length if needed. :0)

Friday, August 21, 2009

A day of Trial and Error

Every Halloween (all two of them :P), it's a battle to get my daughter into her costume. Actually thinking about it a bit, her first Halloween when she was just 1 month shy of 1, she willingly put on her costume (a ladybug). Last year though, I spent a month (yes you read that right) gradually getting her use to her costume to the point that on the day of her Halloween party with her little friends, she actually wore it and the head piece.

About a month ago I started thinking about Halloween and what she'd dress up as. The store I used the previous 2 years is no longer around and I really did not want to go through the hassle of getting her to like the costume. Soooo I did some thinking and thought "Why not dress her up as a Fairy Tale Character?" She be in 'regular' clothes, not a costume, so **hopefully** she would put it on willingly.

I'm not sure how I came about choosing Little Red Riding Hood, I think it was along the lines of "she likes dresses, I doubt she'd mind a little apron added to it and I know she loves hoods, so the cloak/cape would be something I think she'll love".

This line of thought had me at first looking at the costumes available. Ever Google "Little Red Riding Hood costume"? Yeah, not the best results. So I did a quick search on Etsy and after looking at prices, I decided to make my own. This is where someone should have knocked some sense into me. :P

So I did some more searching, found a cute peasant dress and over-skirt pattern on etsy and found a LRRH costume that I wanted to use as inspiration. Should be easy enough right? Well, while the dress the seller posted in her store was super cute, her instructions on how to make said dress were confusing and complicated. I spent the whole afternoon today doing a 'mock up' dress. The first attempt was an abysmal failure.

Using her 'measurements' for my 3 yr old, the dress was way too short and way too narrow, plus her instruction for assembly left a lot to be desired. After a couple of hours of frustration and tearing out seams, I decided to start from scratch. This time however, I took one of N's pillowcase dresses, measured the width and length, re-cut my scrap fabric, and started assembly. From my trial and error earlier, I figured out how things were suppose to go. The one adjustment I made, was making the sleeves longer instead of short, since she'll be wearing it in October when it's going to be chilly.

Anyway, my mom, friends and others have said a pattern is just one big puzzle. In this case, the pattern itself was a puzzle that you start to put together and then realize you are missing important pieces.

The end result however, is that I completed my mock up dress tonight. I'm quite happy with it minus the fact that it's about 2" too short. :0( Unlike her pillowcase dress, this one has sleeves and the neckline is elastic, so that, and my seam allowance (which I accounted for) had me lose some in the length. This however, is an easy fix, I just made note to add an extra 5" to the length and then I can just cut off the extra after trying it on my daughter.

Next will be deciphering the Over-skirt pattern, which I bought from the same seller.

Wednesday, August 19, 2009

Olivia the Owl. err Fry.


For a few days now I've been working on this cute little Owl. I bought the pattern over on Etsy after seeing it featured on a blog I read. I thought "he" (she made an Oliver) was super cute and decided I had to make him.

I had some lovely Amy Butler fabric laying around that I thought would work perfect, I just had to make a quick run to Michaels and get some felt. Which I could start another whole entry on about their selection and quality, but I won't. heh

What I thought would be a quick project turned out not to be the case. The pattern was super easy to follow, the pattern pieces themselves matched up great, it was when it came down to the actual assembly that I had some problems.

Sewing in a straight line? Easy. Sewing around curves and in circles? Just a touch more difficult for a beginner like myself. My first obstacle came when it was time to sew on his/her beak. You can't tell from this angle, but it looks like poor Fry flew into a tree. hehe. It's just a touch crooked. But as my husband noted "It's handmade, it's not suppose to be perfect. Nature is not perfect either." It still kind of bothers me, but not too much, my 3 yr old did not notice it, so whatever right? Needless to say, it only intensified the fact that I do not like hand sewing. :P

My next difficult part was sewing the bottom piece on. Seems easy enough, but it was a pain in the butt.

But in the end, she's all sewn up and my daughter took her when I showed "Olivia", said thanks and immediately started calling her "Fry".

Tuesday, August 18, 2009

A Quickie

I've been busy cutting fabric for various projects and this afternoon decided to take a break and make some baby.legs for jellybean. I tried making them when N was little and the "official" baby.legs became all the rage, but for some reason I just could not grasp the concept. I'm not sure why, because after reading this tutorial, it made perfect sense and was so easy! The best part about this project though? I made 3 baby.legs for a mere $4.30/each! Crazy eh?

Instead of going to walmart and getting girls knee socks, I bought women's crew socks from GAP, where I get a 50% discount on all clothing, so it helped to make this project much more economical then paying $12-$15 a pair! Plus the last time I tried this, I checked out the socks at wal.mart & zell.ers for girls and none of the patterns or colours appealed to me. These ones are a bit on the pink/brown side but that's all GAP really has in right now There were some Orange ones, but I really do not have much that would go with Orange. I'm not sure why the pinstripe ones are so much shorter, I know I've bought socks for myself at GAP, all the same kind and they seem to vary in length.

I'm going to keep an eye out for other colours as winter starts to creep upon us. I remember when N was wee and we were hanging out at home, baby.legs and a onsie were perfect to stay cozy. They worked well under jeans too so that when her jeans rode up while putting her into the truck the baby.legs were there to keep her warm instead of a chill reaching her bare leg.

My almost 3 yr old trying them out:


Ignoring the fact she has no pants on. :p We started potty training over 2m ago and even though she's trained now, she pretty much runs around the house half naked. I've given up trying to keep pants on her unless we are going out. As long as she's wearing panties I'm cool with her being half naked. :p

I have a lot of projects on the go right now - curtains, fitted crib sheets (4), change pad cover, a quilt, a crochet hook holder, another tote, an owl stuffy, birth announcements...yes, I know the design I want and since we are sure jellybean is a girl, I want to get a jump start on them so that all I have do when she arrives is put her name, weight and a photo in the card. First though, I need to find my craft table. hah

Saturday, August 15, 2009

Everyday Tote

If you do a google search for "handmade tote", tons of these cute little totes will come up. They come in all shapes, sizes and colours. There are literally tons of tutorials out there on how to make these cute little totes/purses. I'm ashamed to say I can't find the two tutorials I used to make this bag, as well as the bag I saw on a blog that gave me inspiration for mine. I did however just spend 20 minutes bouncing around crafty blogs and bookmarking a couple of other tutorials for possible future projects.

The fabric I used for one of my fabric designers, Amy Butler. I can't remember the particular fabric name, but if you just google Amy Butler Fabrics, so many of her gorgeous fabrics will come up. Sidenote: I found out a couple of days ago she is putting out some gorgeous rugs now! I doubt they will be in my price range but a girl can dream. I think these two fabrics are part of her midwest collection?

The dimensions are approximately 10" wide and 12" high. I've only put in my Sigg, N's KK and an apple but it could hold quite a bit more. I found a pattern today during my 'wanders' that is an organizer that rolls/folds up to fit in this type of bag that can hold your cell phone, wallet and several other things so you are not digging through your tote looking for it.

Overall, I'm happy with how it turned out, but next time I'd like it to be a bit narrower and taller. The tote I saw that I got inspiration from for this one was a Crochet bag. The crafter had made it for a friend who was going to be in the hospital. She included a Crochet book, a needle roll (she used a crayon roll pattern), some yarns and other items to get her started on crochet. I just guessed the dimensions she used but am pretty sure I'm off, as mine's quite short. The next one I make I'd also like to add a pocket to the inside. Although adding a pocket is just a tad past my skill level right now. lol

If I find the post/blog that gave me inspiration and the tutorial(s) (I used 2) I'll come back and edit this post. :0)

Tuesday, August 11, 2009

Miss Natasha's Party favours

As I mentioned in my previous post, since finding out I was pregnant, I've had the sewing bug bite me. I've made receiving blankets for friends, for me, a fitted crib sheet for a friend and over the weekend I worked on this Crayon Tote to give out as a party favour for N's 3rd birthday.

There are several different crayon rolls, totes, crayon + notepads online, even some free tutorials on how to make them, but none really struck my fancy until I found this one. :0)

I used Michael Miller's Dick and Jane Fabric series for the Poka Dot (Lolli Dot, Dick and Jane block) and Dick and Jane Sentences for the top and bottom bands, the middle red stripe is just some red fabric I picked up.

It holds a 6x8 pad of paper, which I'm not sure where to find (maybe the dollar store?) but for now I just cut up some white paper for the inside.

I'm quite proud with how it turned out and it was not too pricey per child. N is having a small party though, we are not inviting many, so this idea works out nicely.

The inside:

Hopefully it's something that the kids will get a lot of use out of and the mom's will also enjoy! N has one (wallet style with a pad) and she loves it! As a matter of fact it kept her occupied at the doctor's office this morning while we were in the exam room waiting for the doctor. :0)

Monday, August 10, 2009

Bueller? Bueller? Bueller??

She's been gone so long, gone so long...

It's been forever it seems since I posted anything. I could lie and say I've been so busy crafting up a storm I do not have any time to post, but in all honesty, I've not been. Some can be blamed on how much sleep I seemed to require for the first 14-16w of my pregnancy and just how much it's been knocking me on my arse. I remember being fatigued with my daughter, not so much with my 2nd pregnancy, but this 3rd time, I'm not sure if it's because I'm chasing a toddler around or because I'm older or what!

My other excuse is that for the last several months since learning I was pregnant I've set to work sewing Receiving blankets, Flannel Fitted Crib sheets, Curtains, Nesting blocks...you name it, I've got it on my list to do. So far I have finished up 10 receiving blankets (40x40) and this past weekend bought flannel for for 2 fitted crib sheets. I'm kicking myself for not getting enough for 4, as I was buying it during a 50% off sale store wide at my local fabric shop!

And lastly, I've lost my craft room. Starting to feel bad for me yet? hehe Jellybean needs a room of her own and unfortunately that's my craft room. It was never really considered a craft room when we were house hunting, we knew we wanted 2 kids and it was always designated as a kid room. So..because I'm overly anxious, all my papers, stamps etc were packed up and moved out into the basement and put in a corner of N's playroom. I have a plan on how to make it all fit in our Office (which is very small!) but I need to buy shelving to make it work.

So that's where I've been. I'm not sure when I will be back to making any papery crafts, I'm too focused right now on my sewing, but hopefully the papery bug will bite me again soon.

Saturday, June 20, 2009

Hoot Hoot!

One of N's little friends had her 2nd birthday today, which had me in the craft room this morning doing up this card.

I learned how to do the owl with punches from Heather's Punch class. You can see a bit of the tape on his feathers from my ATG Gun but that's what I get I guess for leaving this to the last minute and being in a rush. :P

Anywho, I think he turned out lovely! It's the first card I've made in months (or seems like it) and was every enjoyable to do. I need to get into my craft room more than I have lately.

I used Washington Apple DSP with coordinating colours - so safron, only orange, riding hood red and then added in Chocolate Chip and Close to Cocoa. The greeting comes from a new greeting stamp set in the new cattie, which I can't remember the name of, but it has a bazillion greetings/sayings in the set.

Saturday, June 6, 2009

The Last Chance List..

Updated list as of 6/6/09

Item # Product Description CAN Discount Sale Price Availability
112735 RUB ONS HIDDEN GARDEN BLOSSOMS 12.95 0.5 6.48 Available
105143 DAYS TO REMEMBER 6X6 FR 11.75 0.5 5.88 Out of stock
113888 RUB ONS MANY OCCASIONS 12.95 0.5 6.48 Available
109044 PUNCH SNOW BLOSSOM 13.75 0.5 6.88 Available
111364 RIBBON POLY TWILL SO SAFFRON 7/8" 11.25 0.5 5.63 Available
106961 STAZON REFILL WHITE 6.25 0.5 3.13 Out of stock
114341 COURDUROY BUTTONS PACIFIC POINT 12.75 0.5 6.38 Available
114316 RIBBON ORIGINALS PIG TAILS 18.95 0.5 9.48 Available
111414 RUB ONS HIDDEN GARDEN 12.95 0.5 6.48 Available
114351 DESIGNER HARDWARE HOORAY 6.25 0.5 3.13 Available
114338 COURDUROY BUTTONS KIWI KISS 12.75 0.5 6.38 Available
114019 ACCENTS & ELEMENTS FLEURETTES 13.95 0.5 6.98 Available
114317 RIBBON ORIGINALS DRESS UP 17.5 0.5 8.75 Available
102875 HEMP TWINE RED 3.95 0.5 1.98 Available
101259 HEMP TWINE BLACK 3.95 0.5 1.98 Available
113979 ACCENTS & ELEMENTS CANVAS CUTS 11.25 0.5 5.63 Available
114350 DESIGNER HARDWARE SOHO 6.25 0.5 3.13 Available
111363 RIBBON GROSGRAIN PINK PIROUETTE 1 1/4" 9.95 0.25 7.46 Available
111365 RIBBON TAFFETA RIDING HOOD RED 8.95 0.25 6.71 Available
111847 RIBBON DOUBLE STITICHED BAJA BREEZE 1" 11.25 0.25 8.44 Available
111371 RIBBON GROSGRAIN STRIPED TANGERINE TANGO 5/8" 12.25 0.25 9.19 Available
111373 RIBBON GROSGRAIN STRIPED PINK PIROUETTE 5/8" 12.25 0.25 9.19 Available
111372 RIBBON GROSGRIAN STRIPED KIWI KISS 5/8" 12.25 0.25 9.19 Available
113884 RUB ONS FASHION DISTRICT 12.95 0.25 9.71 Out of stock
114318 RIBBON ORIGINALS VALET 17.5 0.25 13.13 Available
111374 RIBBON GROSGRAIN STRIPED RIDING HOOD RED 5/8" 12.25 0.25 9.18 Available
111370 RIBBON GROSGRAIN STRIPED PACIFIC POINT 5/8" 12.25 0.25 9.18 Available
111415 RUB ONS GREATEST MOMENTS 12.95 0.25 9.71 Available
113887 RUB ONS BRIGHT DELIGHTS 13.95 0.25 10.46 Available
111416 RUB ONS CHATEAU BELLA 12.95 0.25 9.71 Available
111338 NOTES TEXTURED LOVE ASSORTMENT II 15.5 0.25 11.63 Available
111879 RIBBON SATIN KIWI KISS VERY VANILLA 9.95 0.25 7.46 Available
111277 RUB ONS A PERFECT DAY 12.95 0.25 9.71 Available
110730 DIE CUTS POCKETS & PIECES 10.75 0.25 8.06 Available
107272 PUNCH KEY TAG 19.95 0.25 14.96 Available
113980 DESIGNER SERIES PAPER CANDY LANE 11.75 0.25 8.81 Available
111375 RIBBON GROSGRAIN STRIPED BAJA BREEZE 5/8" 12.25 0.25 9.19 Out of stock
112010 DIE CUTS BLOOMS AGAIN 10.75 0.25 8.06 Out of stock
113991 TASTE OF TEXTILES 11.75 0.25 8.81 Available
101399 STIPPLE BRUSHES 8.25 0.25 6.19 Available
112092 BUTTON BOUQUET 9.5 0.25 7.13 Out of stock
112139 NOTES CAROUSEL II 13.95 0.25 10.46 Out of stock
111336 NOTES SCALLOP II 13.95 0.25 10.46 Available
111840 CLASSIC STAMPIN INK REFILL PACIFIC POINT 3.5

Available
111841 CLASSIC STAMPIN INK REFILL TANGEIRNE TANGO 3.5

Available
111843 CLASSIC STAMPIN INK REFILL PINK PIROUETTE 3.5

Available
111839 CLASSIC STAMPIN INK REFILL RIDING HOOD RED 3.5

Available
111842 CLASSIC STAMPIN INK REFILL KIWI KISS 3.5

Available
112161 DESIGNER SERIES PAPER PATTERNS KIWI KISS 11.75

Available
112042 DESIGNER SERIES PAPER URBAN GARDEN 11.75

Available
112156 DESIGNER SERIES PAPER PATTERNS PINK PIROUETTE 11.75

Available
112150 DESIGNER SERIES PAPER PATTERNS PACIFIC POINT 11.75

Available
112153 DESIGNER SERIES PAPER PATTERNS TANGERINE TANGO 11.75

Available
111844 CLASSIC STAMPIN INK REFILL BAJA BREEZE 3.5

Out of stock
111836 CLASSIC STAMPIN PAD RIDINGHOOD RED 6.95

Available
111838 CLASSIC STAMPIN PAD PINK PIROUETTE 6.95

Available
113966 DESIGNER SERIES PAPER GOOD MORNING SUNSHINE 11.75

Available
109123 STAMPIN WRITE JOURNALER BASIC BROWN 3.95

Available
113981 DESIGNER SERIES PAPER BELLA BIRDS 11.75

Available
112157 DESIGNER SERIES PAPER PATTERNS BAJA BREEZE 11.75

Out of stock
113975 DESIGNER SERIES PAPER RASPBERRY TART 11.75

Available
114037 DESIGNER SERIES PAPER SPECIALTY SWEET SLUMBER 13.95

Available
113978 DESIGNER SERIES PAPER URBAN OASIS 11.75

Available
112041 DESIGNER SERIES PAPER BELLA ROSE 11.75

Available
112468 DESIGNER SERIES PAPER SWEET ALWAYS 11.75

Out of stock
111834 CLASSIC STAMPIN PAD TANGERINE TANGO 6.95

Available
114039 DESIGNER SERIES PAPER SPECIALTY ROCKABILLY 13.95

Available
108590 CARD STOCK NATURALS ASST 12X12 10.75

Available
111337 NOTES GIFT ASSORTMENT II 11.75

Available
112471 DESIGNER SERIES PAPER RAINBOW SHERBET 11.75

Out of stock
112464 DESIGNER SERIES PAPER MANCHESTER 11.75

Available
112006 ACCENTS & ELEMENTS FLOWER FUSION II 17.95

Available
111837 CLASSIC STAMPIN PAD PACIFIC POINT 6.95

Available
112461 DESIGNER SERIES PAPER WASHINGTON APPLE 11.75

Out of stock
113993 DESIGNER SERIES PAPER SPECIALTY PARISIAN BREEZE 13.95

Available
112155 DESIGNER SERIES PAPER PATTERNS RIDING HOOD RED 11.75

Available
111353 CARD STOCK KIWI KISS 8-1/2 X 11 6.5

Available
111348 CARD STOCK RIDING HOOD RED 8-1/2 X 11 6.5

Available
112172 SIMPLY SCRAPPIN ROCK A BYE BOY 23.95

Out of stock
100900 GIFT SACKS WHITE 3.5

Available
114605 SIMPLY SENT CARD KIT MORE THOUGHTS 50.95

Out of stock
102264 COLUZZLE STARTER KIT 23.95

Out of stock
111346 CARD STOCK IN COLOR 12 X 12 10.75

Available
111835 CLASSIC STAMPIN PAD KIWI KISS 6.95

Available
111350 CARD STOCK PACIFIC POINT 8-1/2 X 11 6.5

Available
105668 TATTOO KIT I 16.5

Out of stock
111349 CARD STOCK TANGERINE TANGO 8-1/2 X 11 6.5

Available
109231 SIMPLY SENT CARD KIT SENDING HAPPY THOUGHTS 64.95

Available
111351 CARD STOCK PINK PIROUETTE 8-1/2 X 11 6.5

Available
112165 SIMPLY SCRAPPIN ROCK A BYE GIRL 23.95

Out of stock
113950 DIE CUTS BUILD-A-FAIRYTALE 10.75

Available
111345 CARD STOCK TEXTURED IN COLOR 12 X 12 13.95

Available
105669 TATTOO KIT II 16.5

Out of stock
111833 CLASSIC STAMPIN PAD BAJA BREEZE 6.95

Available
113936 SIMPLY SCRAPPIN HOPPY MEMORIES 23.95

Out of stock
111347 CARD STOCK IN COLOR 8-1/2 X 11 9.5

Out of stock
107288 ENVELOPE WHISPER WHITE EXTRA LARGE 6.5

Available
104310 CRAFTERS TOOL KIT 49.95

Available
111352 CARD STOCK BAJA BREEZE 8-12 X 11 6.5

Available
113943 SIMPLY SCRAPPIN 2 SWEET 23.95

Available
113925 SIMPLY SCRAPPIN SWEET NOTHINGS 23.95

Available
112179 SIMPLY SCRAPPIN LOVE STORIES 23.95

Available
113911 SIMPLY SCRAPPIN SUNSHINE GARDEN 23.95

Out of stock
112054 SIMPLY SCRAPPIN BEST EVER 23.95

Out of stock
111253 Blooms & Bulbs 7.75

Available
109684 Doodle 9.95

Available
111257 Happy, Happy Birthday 9.95

Available
109692 Love 7.75

Available
109568 My ABCs 7.75

Available
109682 Perfectly Pretty 7.75

Out of stock
109687 See You Around 9.95

Available
109683 So Swirly 9.95

Available
111260 Something Fishy 9.95

Available
111262 Stems & Silhouettes 9.95

Available
105516 Watercolor Joy 7.75

Available
114528 Embosslit Flower 13.95

Available
116209 Note of Thanks 11.95

Available
116210 Birthdays Counts 11.95

Available
112966 Curly Label Bundle* 39.95

Available
115535 Hand Drawn Bundle


Available

* The punch which is part of the Curly Label Punch bundle will carry over into the 2009-2010 Idea Book and Catalog

Thursday, May 28, 2009

Have you picked up

your copy of Paper Crafters Magazine July/August?? You just might find a sneak peak in there somewhere. ;0) I can't say if it really is 'true' but what I read was new for me! I'm kind of surprised SU would let it slip out, so maybe it's just a 'white herring'. :p

I can tell you as a demo I'm excited for Monday. We get our Sneak peeks from the new cattie (which will include the new "In Colour" line) and the Last Chance list will be published. Hopefully none of my favourite stamps or accessories are on there!

Monday, May 4, 2009

Bundle of Joy

This has been in my drafts folder since March! It was for a friend's shower, which she finally had a few weeks ago, so it's now safe to post the card w/o worrying about her seeing it before the shower. ;)

I've seen this layout in SCS galleries numerous times. I loved it from the first time I saw it and always wanted to try it. As luck would have it, last night while I was looking through a stamp gallery I came across the tutorial for it on Diane's blog. I did not think it would be too hard to do, but I always enjoy a good tutorial, so it was nice to find one and read just how easy it was to do this simple but cute card!

She created a cute thank you card, but like I said, I've got tons of friends due to have babies soon, so I grabbed my "Little bundle of Joy" stamp from "Punches Three" and made it into a cute Baby card. I saw a similiar idea on SCS (uses the same DSP and stamp), but to change mine up a bit I used Kraft as a base for the card and added some ribbon. I love Ribbon and try to add it to most of my cards as I do not get much opportunity to add it to my scrapbook pages.

I would have loved to have used some jumbo brads or medium brads for the ribbon to go through, but unfortunately both were too big and I did not like the look of the 1/8" ones (reg. size). I did so a little sponge around the edges with So Safron Ink and had some fun drawing on my stitches. :0) The only thing that would have been nice would have been having a 1 1/4" square punch. I made my 12 "blocks" using my paper trimmer (I seem to have every punch but the square ones) and there is a bit of room for error if you do not trim each one exact!

I love the colours on this card, it's perfect for a boy or a girl so if you do not know what the expectant mom is having, this makes a card with some lovely colours.

Two baby shower cards down, 2 more to go, as well as 2 kid birthday cards.

Recipe:
Paper: SAB DSP, Kraft, Bashful Blue, So Safron, Whisper White
Stamps: Punches Three
Ink: Bashful Blue, Certainly Celery, So Safron
Accessories: So Safron Ribbon(SAB), Wide Oval Punch, Dots Embossing Folder, Big Shot, Close to Cocoa Marker
Inspiration: Diane's Tutorial, Arlene Mantle's card on SCS - It was not until I was browsing the Punches Three Gallery and saw her card that a) I knew what paper to use and b) found the link to Diane's tutorial. :)

Sunday, April 5, 2009

Funny Faces

Another scrapbook page. This uses some of my favourite DSP - Sweet Slumber. These photos of Tash were taken I think in January. She was suppose to be eating lunch and instead was laughing, giggling and making faces at me. So I grabbed my camera and surprisingly she continued to perform for the camera. :0)

Tuesday, March 31, 2009

Animal pile-up

I sadly missed my friend's celebration of her son turning 2 this past weekend due to work, but I still made a card and dropped it off the following day.

I gained inspiration for this card from several 'animal pile ups' that were on SCS. It's a the set "Wild about you" (I think!) and the leaves are from the set "Season of Friendship" and the balloons are from "In the Family". Of course after I gave it to her and her son I said "Whoa I should have totally use the scallop punch to make clouds!

I sort of cursed all the cutting out I had to do for the animals but I think in the end it made a great card and it really was not that bad with all the cutting.

I actually had fun piling them up and shading the animals as well as stamping out the leaves. The photo is pretty good in that you can tell that I used a lot of dimensionals!

Ingredients:
Stamps: Wild about you, Season of Friendship, All in the Family, Circle of Friendship. Paper: Certainly Celery, Chocolate Chip, Whisper White. Ink: Going Gray, Basic Gray, Close to Cocoa, Chocolate Chip, Summer Sun, More Mustard, Buckaroo Blue, Bordering Blue, Certainly Celery (I think?), Old Olive. Accessories: Scallop Punch, 1.25", 1 3/8" circle Punch, my scissors! hah

Sunday, March 29, 2009

Zoo Favourites

A couple of weeks ago, I rented a fancy smancy lens for my DSLR (Canon 70-200 f/2.8L IS) and the following day we headed to the zoo. It was my first visit with a nice zoom (my biggest is 105) so I took full advantage and got some great close ups of the koala, gorilla, bear and many other animals. It was a great visit and N had an awesome time at the playground and seeing the animals! I also got to take a lot of photos as my MIL and Husband were there to watch N while I took my time taking photos.

This page gives you a 'sneak' peak of the some new DSP "Walk in the Garden" that will be available for purchase in the new spring mini! I loooveee this paper, it's so pretty. What makes it even nicer is that it's Baja blue, one of my favourite In Colours. For the title I used the Cricut Cartridge Zooballoo at the LSS. Of course after I had done the letters I realized I should have made them smaller, but I don't think it looks too bad. I also got to use my newly purchased Corduroy buttons. I love the cord. buttons!

The kangaroo statue is new! It's right by the playground. Since we went on a weekday that was not too warm there was no waiting to take N's photo in the pouch. I imagine this summer there will be kids getting piled into it all the time.

Saturday, March 28, 2009

funSHINE

I finally made it to the LSS this morning to do titles for my scrapbook pages. This page is actually a sneak in from 2008. I had not "planned" to add anymore pages to her Year Two album, however when I was looking through it a week ago (admiring my work! ha) I noticed I had 2 empty pages side by side. I flipped back and fourth a bit hoping what was on either side of it would jog my memory, but it didn't.

So I went through her archives for Year 2 and chose these photos from a visit to Arbour Lake with some friends. I had originally wanted to scrap them, but it was one of those situations where there were not quite enough photos for a double layout (which I prefer to do), and I was unsure on what pictures to use. Obviously I figured out a solution!

I used I think Jersey Shore DSP (I have 2 pkgs that had not even been opened yet!), Real Red for the framing and I hand drew the flower and cut it out. I like how it micmic's the flower on her bathing suit. :0)

Ingredients:
Paper: Jersey Shore, Real Red, Only Orange, Bashful blue, Certainly Celery, Riding Hood Red, Pink Pirouette, Night of Navy. Accessories: Cricut - Opposites Attract.

Wednesday, March 25, 2009

I'm around. :0)

I've been busy doing scrapbook pages! Since the weekend I've done 2 layouts and am finishing up the 3rd layout today, hopefully. :0) I've not taken any photos or posted them as of yet though because I need to still do titles. I think I mentioned on here that I sold my circut? Well I now have a membership at the local scrapbook where I can use their circut, but I wanted to have a few pages done first before I headed over (it's 5mins from my house) to do titles. So this weekend I should have some pages to share.

Nothing too busy or extravagant, I've been sticking to fairly simple layouts lately. I also need to get my but in gear and do a mother's day card and 3 birthday cards, 2 for my sisters and one for my mom. :0)

Monday, March 16, 2009

Days in the making.

Ok, maybe I'm exagerating a teeny bit, but for some reason I've had the toughest time working out this card. I spent most of the afternoon on it. This is the 3rd or 4th card I made before I decided I liked the layout, the colours and the DSP.

The first card I did, I liked, but did not love and was going to settle on it, but then I messed up and bc I had "just" enough of one pattern of paper, I was not able to make enough to finish them.

Needless to say, I'm happy that I finally that I finally created this card. A loves it, so I just have to do 4 more now.

I'm not sure if I mentioned it before buy my friend who owns Clippopotamus asked me and another friend to do her some cards for a tradeshow she's going to in April. So designed 3 and did 25 total while another friend designed 3 and did another 25. That's why there is a space in the bottom right where I would normally put a greeting and a ribbon. Alexandria will be putting her clippos there. :0) Plus I did not have any Tempting T. ribbon, just Only Orange and when I put it on the card to see, it was waaayy too much orange. This works though. :0)

PS. Check out Clippopotamus they are awesome clippos!

Ingredients: Paper: Whisper White, Bali Breeze DSP (I've had this stuff kicking around for a while I think it's from 2 catties ago!), Only Orange, Watercolour Paper. Stamps: Sock Monkey & Sock Monkey Accessories. Accessories: Stampin' Up Markers.

Friday, March 13, 2009

Birthday Flowers


I made this card without anyone in particular in mind. I just know I have zero birthday cards done up for the upcoming birthdays in April and May so thought I'd do one up as a small break from making baby cards. :0)

Does this look familiar to anyone? It's cased off of this card, and she gained her inspiration from a girl's quilt at Pottery Barn Kids. :0) I guess it would be more familiar if you have kids and love PBK. :p

I changed it up a little bit by adding buttons to the center for the flowers and using some cloud paper from Sweet Slumber DSP. I think it turned out rather cute! It's the first card in a very long time that I've not used any stamps for. Well minus the greeting. :0)

Ingredients: Paper: So Saffron, Certainly Celery, Sweet Slumber DSP and I'm not sure fir the flowers..I used some paper from the 6x6 paper share I did with Heather and it's all mixed up now. :p Stamps: Not sure where I pulled that Happy Birthday from. hah. Accessories: Buttons!

Thursday, March 12, 2009

Birthday Butterfly

For a week now I've been trying to come up with a cute birthday card for one of N's little friends. I had considered doing the Sesame Street crew using punches, but she is 1 and has no idea who they are, so I've spent a week trying to figure out something, and then in the process of creating a card for someone else, and getting inspiration from Flutterby AtomicButterfly's Gallery on SCS, more specifically this card, that gave me the idea for mine.

My card does not really look much like her card, but that's the card that inspired me to create this one. she has some awesome cards in her gallery and seems to have a knack for creating multiple layers seamlessly without them looking overly cluttered or too busy. I always have such a tough time with layers, so it's nice to go through her gallery and see how she's "stacked" things.

Hopefully this card will also suit my friend that needs some birthday cards for a tradeshow she's attending, then I can get to work making them. :0) My husband saw it when he got home from work today and said "Nice, it's very...pink". Hah I think because I've done so many baby boy cards in the past week that given the opportunity to do a girl card I went to the very 'girly' extreme.

Ingredients: Paper: Pink Pirouette, Riding Hood Red, Bella Rose DSP. Stamps: Flight of the Butterfly, Circle of Friendship. Punches: 1/8"1"/1 1/4"/1 3/8" - circle punches, Scallop Edger Punch, Scallop Circle Punch. Accessories: Crystal Effects (butterfly wings), Pink Pirouette Ribbon.

Wednesday, March 11, 2009

I hope it's a boy!

I saw this sweet card over on Flutter by Atomicbutterfly and just had to case it for another expectant friend whose due at the end of this month. The only difference between her card and mine is I left off the button and the stitching. Love the paper (good thing I have 2 pkgs of it!), layout, stamps, everything! It's a super sweet card.

This is the 5th boy card I've made in the past week. I have 2 others I've completed but I have to wait to share them as the ppl they are for read this blog. :p

And with this card, I think it's my last baby card. I just have to finish up a birthday card for a little boy and have a girl card left to make. I have one done, but I'm not sure I want to use it.

Ingredients; Paper: Whisper White, Delicate Dots. Stamps: Nursery Necessities. Ink: Certainly Celery, So Saffron, Bashful Blue. Accessories: Scallop/Square Nestabilities, Certainly Celery ribbon, scallop edger punch.

Tuesday, March 10, 2009

Vanilla Ice Cream Sundaes and Summer Sun.

I decided to take a baby card making break and play with one of my stamps sets that I had not mounted yet, Goody Goody Gumdrops! It's a lvl 3 hostess set in the Stampin' Up Catalogue.

I got inspiration for this card from one Heather did a little while ago on her blog. I changed it up a little bit though to personalize it more to my style.

I even got to use my nessies for this one, the small scallop circle and regular circle. I've had them for probably 6m now and this is th first time I've even used them! I've played around with them but whenever I did, what I wanted to do never turned out th way I expected, so I never ended up using it on the card. I think if I do this card again I'll use an oval nessie instead. The circle works well, but even with some bashful blue shading, it's still a bit too much 'white space'.

I'm not sure who this card is for, but with numerous birthdays coming up this year I'm sure it will make it's way to someone's home. :0)

Ingredients: Paper - Kraft, Real Red, Old Olive, Summer Picnic DSP, watercolour paper. Ink: SU Markers, Basic Black. Stamps: Goody Goody Gumdrops. Accessories: Circle and Scallop Circle Nessies.

PS. I'm slowly getting images re-loaded on my entries!

Monday, March 9, 2009

Congratulations2

This card is for a friend that is having twins! What fun eh? She's also a bit of a science geek so I thought it was totally cute to use the congratulations2 greeting. Plus I've been dying to use the cute little onsie from By Ones, By Twos forever!

You are all probably wondering just how many friends I have that are pregnant and due soon. The answer is Five. :p Crazy eh? It's all friends that live locally as well, so our playdates are about to get really crazy this summer.

I have to say that I LOVE DSP, it's called "Sweet Slumber" and unfortunately I only had a tiny bit of it! I did a paper share that Heather was hosting bc I could not decide on what DSP to get from the current cattie. I thought if I went in on the share it would help me decide what to get. This DSP is definitely only the list now! I also need to order some Boquet Buttons, as I wanted to put 3 small flower buttons under the congratulations greeting. :0)


Ingredients: Paper: Baja Breeze, Sweet Slumber DSP, So Safron. Stamps: By Ones & By Twos. Ink: StazOn Black. Accessories: Word Window Punch, SAB So Safron Ribbon. Inspiration: Niki E. (Although in the end, it did not end up anything like this card. heh but it's the card that got me to work on this one)

Sunday, March 8, 2009

Babies, Babies and more Babies

First, there are a lot of dead links on my blog right now for images. I did a little re-arranging/house cleaning a week ago to clean up my Flickr account. I'm working on getting things back in order but it's going to take some time.

There are a slew of babies being born as well as well as a ton of birthday parties that N will be attending over the next few months so I thought it might be a good time to get some of my creative juice flowing and start making some of the required cards for the occasion. This one is for my friend S. I'll be attending her baby shower this weekend. Since I've been on a mini-break from crafting for a while I decided what better way to jump back in then to do a little casing to get back into the swing of things. The layout for this card I saw over on Heather's blog and I pretty much cased it right down to the stamp used. The only thing I changed was the ribbon (mine is from SAB) and one pc of patterned paper (again SAB).


Paper: Kraft, SAB & Summer Picnic, Certainly Celery
Stamps: Bundle of Joy
Accessories: SAB Ribbon, Paper peircing kit, SU Markers
Inspiration: Stamping with Heather

Saturday, January 31, 2009

Sale-A-Bration Time!

It's that time of year again! When you spend money on Stampin' Up product and receive free product! It's Sale-a-bration time!

Starting Feb. 1st, for every $60 you spend you will receive a free product! There are some lovely stamp sets and some Yummy ribbon and paper as well this year!

Customers:(this can be done online or you can email me) - You get to select any one of the Sale-a-bration items with a purchase of $60. AND there is no limit, so for every $60 you spend you get another item! Remember these are limited time Stampin' Up! supplies that are here only from Feb. 1 to March 31st

Hostesses - If you host a workshop and your sales are $350 you will also earn yet another Sale-a-bration item!

Feel free to email me if you'd like to host a party order for you. :0)

Friday, January 30, 2009

Another Scrapbook page


I *think* I'm almost done Natasha's 2nd Year Album. I finished up these two pages yesterday.

These pictures are from our Camping trip last summer at Dinosaur National Park. I have to admit that it was one of the hottest weekends ever! People at the campground were getting into their cars and driving around the grounds with their air conditioning on to cool off. There was not one bit of a breeze what-so-ever! Luckily once the sun set it cooled off and was not so bad the next day. :0)


I cased this layout from Heather's cmas page that she did. I made a few changes, using a horizontal pic on the 2nd page, only one pc of patterned paper and diff. embellishments and papers. :0) The stamp set I used is called "Happy Camper" and the Jumbo Wheel "Nature Hike" I love doing this page and it got me excited to go camping again this summer!

Saturday, January 17, 2009

Hip Hip Hooray, It's a Gymboree Day!

When N was wee I took her to Gymboree. The first session we went to she was very young and I did not feel she got much out of it, so I waited until she was walking/running around and signed up for another one, which she got much more out of. :0)


There's a lot of buttons on this bc a) I thought they were fun with the Gymboree theme and plus I've had these buttons for ages so wanted to use some of them up.

Monday, January 5, 2009

Still Scrap'n away

Another page done for Natasha's scrapbook. I kept this one simple and clean. The husband gets all complainy when I show him a page that has too much embellishment. He prefers clean and simple and I tend to agree with him most times.

This is the last page in her album (but certainly not the last one I need to do to finish off the year!) with only 5 more months to do for the year.

I have double page layout done up, pics printed etc, I just need to glue down the photos/paper and add some embellishment. Hopefully I'll have that one to share later this week. Everyone in the house is sick this week, well not my husband, Mr. Immune to everything so I do not have much time to craft. Natasha is not feeling well and is super needy today. And being sick myself, I'm finding it a bit hard to be patient with her.